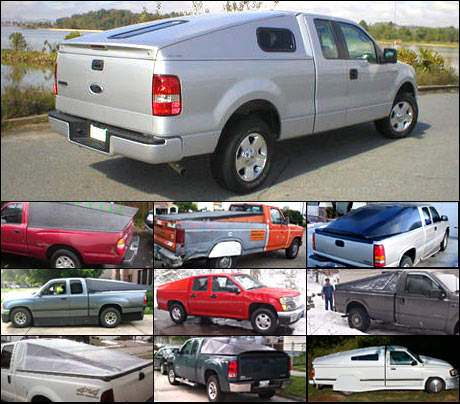
Aerocaps for pick-up trucks
 When people think about fuel economy, they usually think about small cars, perhaps a mid-size hybrid. If they think about trucks, its usually to contrast them with a more efficient vehicle (and perhaps chastise truck owners for their wasteful choice).
But while cars are great if you need to get yourself and maybe a few other people from one place to another, they don’t excel in moving large amounts of stuff, and can’t tow very much.
If you regularly need to move lots of big, bulky, or heavy stuff, or tow something large and heavy, but rarely need to move more than a couple people, a truck makes a lot of sense.
Of course there is a reason that trucks are seen as inefficient: they are. They are heavy, overpowered (although cars are even more so these days), and not at all aerodynamic.
Then again, because trucks get such low mileage to begin with, improvements in their mileage have a relatively bigger impact. For example, an increase of 15mpg for a 45mpg car is a 33% increase and will save 55 gallons of fuel over 10,000 miles. Not bad, but that same 15mpg improvement to a 15mpg truck is a 100% increase, saving 333 gallons over the same distance.
So what is a mpg-conscious person who needs to move a lot of stuff to do?
The classic question was whether its better to drive with the tailgate up or down – the reasoning being that the tailgate might be catching the air coming off the roof like a parachute, being a flat vertical surface and all. It turns out though that (at least for most trucks) that at speeds an air bubble naturally forms in the truck bed of an open bed pick-up with the tailgate up, and that creates a virtual tonneau which deflects the air current over the gate. With the tailgate open, that bubble can’t form, and aerodynamics is actually decreased overall, reducing MPGs along with it.

(image from: http://johnversteeg.com/projects/2 )

(image from: http://www.symscape.com/blog/tailgate-up-or-down )
It’s important to note that this does not seem to be universally true; while the MythBusters and some (better controlled) studies have found better fuel economy with the gate up, other studies have found the opposite: reduced air drag with the gate down.
Which actually shouldn’t be too surprising, given the complexity of fluid dynamics, and the plethora of shapes and sizes and other variables that go into the design of a truck bed, cab, and tailgate, from length of bed and height of cab, to whether edges are sharp or rounded. In any case, neither shape of truck bed is optimal for aerodynamics, and the potential improvement gained by tailgate position is relatively minimal.
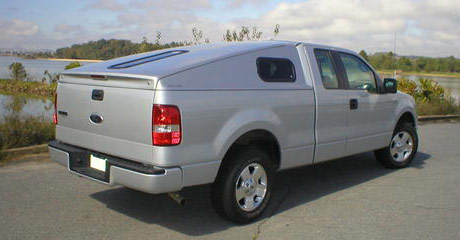
The next step in truck aero evolution is the tonneau. When installed, it makes the truck bed a solid flat surface at the height of the bed rails and tailgate.
Now instead of a virtual surface closing the truck bed, consisting of a bubble of air, there is an actual surface there, to do the same thing.
Unfortunately, this is still far from the ideal tear-drop shape, and (again, unsurprisingly) while it is frequently seen to improve fuel mileage, it isn’t by terribly much, and it doesn’t consistently show any improvement at all.
The goal is aero-mods is to make a vehicle as close to a teardrop shape as possible.

And while many car designs typically match this shape better than an open bed pick-up truck,

the large bed area (with no particular requirements for headroom) leave a lot of room for modding a cap to make it fit the shape even better:


The result is referred to as an “aerocap” or “aeroshell”, and it can potentially give a truck lower air drag than some cars, while providing a covered and secure space to store cargo.

Of course none of this is news to serious ecomodders, and a large number of varying designs have been built, with different solutions to balance the trade-offs of maximum aerodynamics, interior space and accessibility, rear visibility, being securely attached but easily removable (in case on needing to use the truck bed for large items), and looking seamless and integrated.
Here are some of the designs that have been showcased in the ecomodder forums:
AeroHead / ITworks / Phil Knox’s T-100

One of the very first. Phil has been aeromodding since the oil embargo of the 1970′s. This particular truck was in the form in the picture in 2005.
Measured coefficient of drag on the stock truck, plus aeroshell: 0.325
For reference, an open bed pick up has a cd around 0.40 to 0.45, a typical car 0.30 to 0.35, and the original Honda Insight had a Cd of 0.25, the lowest of any standard production car.
The lower the number, the less air resistance.
With all of the mods shown in the picture, coefficient of drag dropped all the way to: 0.25
The shell alone caused a 13% highway mileage improvement compared to the same truck at the same speed without it, 27.5 miles per gallon (EPA 25), and with all aeromods it got 32mpg at 70mph.
For more on this truck, see: http://www.evworld.com/article.cfm?storyid=870
AeroHead / ITworks / Phil Knox’s T-100: V2

The original aeroshell was partially eaten by goats (or something like that…)
So he started over, and built another, goat-proof shell, and, as heavily aero-moddified as the first version was, he took the new one even further.
The new shell is made from the hull of a sailboat – you can tell in the first picture, the others are the same, just painted, and later with a window which removes the passenger side blind spot.
Aerohead takes this to Bonneville for racing and setting records and such, so the priority is maximizing aerodynamics over cargo carrying utility (the shell is removable though, so the truck could be used like a truck).
Theoretical Cd of 0.156
almost 80% mpg improvement compared to an original unmodified T-100, at 36mpg highway!
And yet still this was not enough – he has also built a trailer that attaches to the back of the truck just to extend the aerodynamic taper even further!
Wow. Just wow.
A labor of love with years and years of labor put into it.
For more on this absolutely magnificent monstrosity, see:
http://ecomodder.com/forum/showthread.php/pickup-truck-streamlining-14884.html
http://ecomodder.com/forum/showthread.php/basjoosing-toyota-t-100-articulated-front-wheel-skirts-22971.html
and
http://ecomodder.com/forum/showthread.php/full-boat-tail-trailer-gap-fillers-toyota-t-7839.html
Bondo / Brett Herndon’s Aerolid
Ok, so the ITworks T-100 may be a little too extreme for the average pick-up truck owner.
On the other end of the spectrum of customization and labor required by the end user is the very polished and professional looking “Aerolid”.
These are available for purchase.
The long term goal is funding for large scale commercial availability (patent pending), but even without corporate sponsorship, he has already produced several on his own, and has a website up for their sale.
Highway mileage increase (on this truck) of over 20% 18mpg to 22.
For times the truck needs to be used for serious truck stuff, the center section can be removed without removing the entire shell
If a load is just a little too big to fit under the shell, but not so big it has to be removed entirely, it is hinged and can swing up partially; also making it a potential place to hang out while camping.
For more interior space and even better aerodynamics, there is an optional extender kit that is deployed with the tailgate down, which can fold away when not in use
For more on the Aerolid, see his website: http://www.aerolid.com/
or the ecomodder thread http://ecomodder.com/forum/showthread.php/commercially-produced-aerodynamic-pickup-bed-cap-583.html
In between those two extremes the DIYers at Ecomodder have come up with plenty of unique designs:
SkyKing’s aeroshell/boat tail for the Dodge truck “Woody”

Made from laminated plywood sheets on a plywood frame, this design goes further and lower than any other.
26mpg highway from an otherwise unmoddified (except those beautiful wood side boxes) 1-ton.
For more on Woody’s shell, see: http://ecomodder.com/forum/showthread.php/testing-aeroshell-boat-tail-dodge-22354.html
T Vago’s compound curve foam board pickup aeroshell
10% improvement, from 19mpg to 21mpg with no other mods.
Its made of foam, so its very light; which is good, sense adding weight reduces fuel economy, which would be counter-productive. Also, it makes it easier to take off when the bed space is needed for big bulky stuff.
You can read much about its design process on a previous blog post: http://ecomodder.com/blog/makings-pickup-aerocap-vagos-dakota/
as well as the forum thread http://ecomodder.com/forum/showthread.php/t_vagos-compound-curve-foam-board-pickup-aeroshell-15862.html
BamZipPow’s T-100 Aerocap

Made from coroplast (plastic sheets) over wood and metal frame.
Up to 27mpg highway.
Long thread covering everything from concept to construction to V2 trials:
http://ecomodder.com/forum/showthread.php/another-truck-aero-cap-idea-15137.html
JRMichler’s Nameless’ Canyon topper

Along with other mods, improved mileage from 21mpg to 30mpg in winter, and 27 to 35 in summer, with around 2mpg of that increase specifically upon replacement of the original non topper with this one.
Believe it or not, it is constructed of plain old plywood, waterproofed and strengthened with epoxy, and prettied up with some hardware store paint.
Details at http://ecomodder.com/forum/showthread.php/modding-06-gmc-canyon-17070.html
JRMichler’s brother’s Ford F-250
Mileage of 23.5mpg, up from 19.5
Not a lot of information on it is public, but what there is is here:
http://ecomodder.com/forum/showthread.php/modding-02-ford-f250-16798.html
Bajascoob’s Lightweight Aerocap on BigWhiteWhale
In addition to being relatively light, this design neatly solves the issue of reduced visibility created by every single other aerocap design. The entire thing is completely translucent.
Unfortunately, plastic film isn’t 100% clear, so while he can see headlights behind at night, it isn’t clear enough to allow eliminating outside side mirrors.
Went from 16 to 19mpg.
Made of 1/2″ metal conduit frame wrapped in 4mm film, for a total of roughly $20 material cost.
More here: http://ecomodder.com/forum/showthread.php/f-250-7-3-4wd-light-aerocap-12573.html
Swede’s Aerolid
Coroplast over a welded 1/2″ conduit metal frame.
13% improvement, from 20mpg to 23.
Read more: http://ecomodder.com/forum/showthread.php/swedes-aerolid-build-thread-13092.html
Kevlar’s aero “Toyota truck” (Apparently in 1992 Toyota didn’t give its trucks model names or numbers?)
Made of fiber-reinforced plastic board panels, the stuff public restroom stalls are made from.
31mpg actual, with an EPA estimate of only 24mpg highway
Since sold – and the new owner is reporting even better mileage, 32-36mpg.
http://ecomodder.com/forum/showthread.php/aero-truck-project-begins-2269.html
Ccrider’s Tacoma Aerocap


1/2″ Plywood on a wood frame.
$45 worth of material, including the paint.
30+ mpg in a truck rated for 20.
Simple, inexpensive, yet the numbers speak for themselves.
Build thread at: http://ecomodder.com/forum/showthread.php/aerocap-tacoma-pickup-11271.html
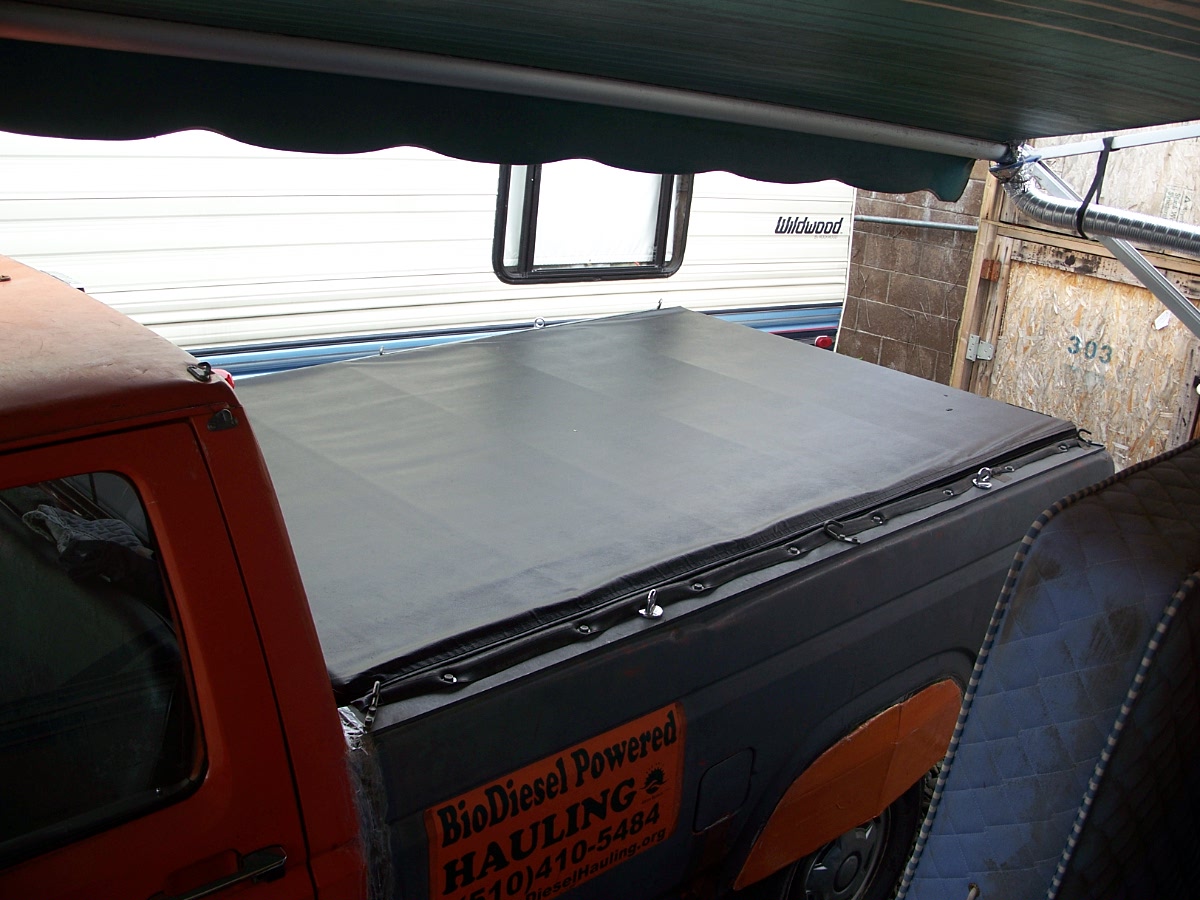
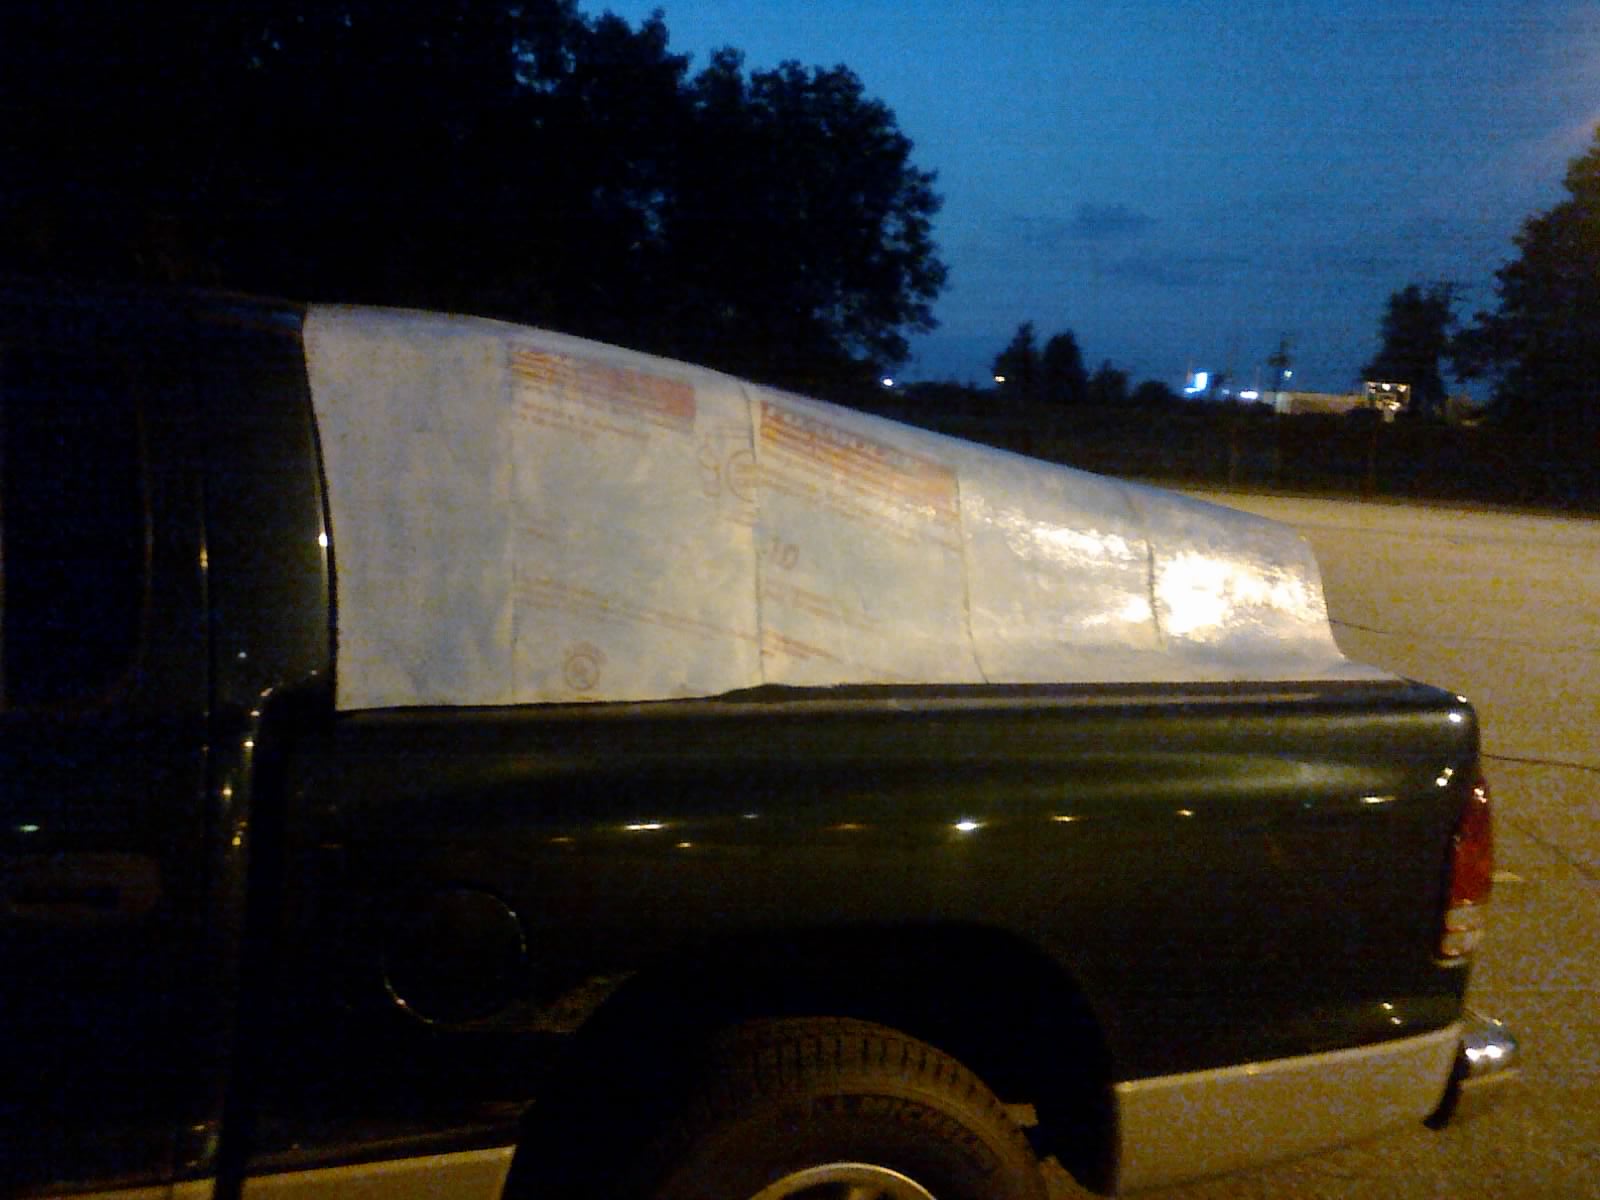
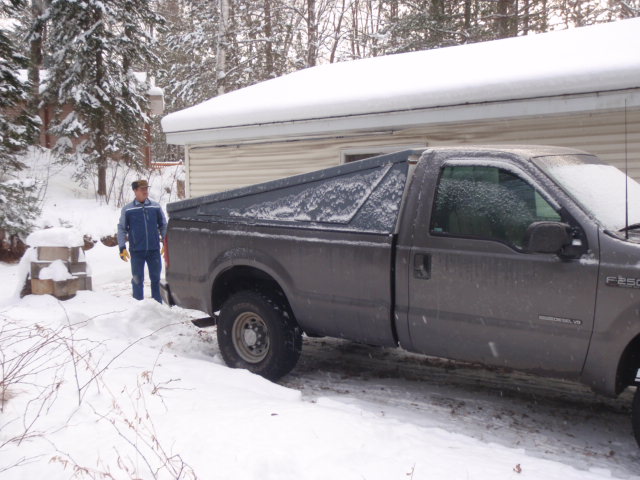
Jacob Aziza’s Big Orange Work Truck’s tilted tonneau
(That’s me, the author)
Mine represents the opposite extreme from the first truck in this list, the ITworks T-100 in the trade-off between aerodynamics and the ability to use the truck bed.
Unlike every other design, the cover does not actually start at the roofline. From an aerodynamic perspective this is a pretty major design flaw – it means that the air flowing off the back of the roof will not continue on smoothly to the cover, but will actually separate, leaving an air space of slower moving and potentially turbulent air right behind the rear window.
I was aware of this when I built it, but I decided it was more important to have a fully unobstructed view to the rear. I regularly drive this truck in dense city traffic, at lower than normal speeds on major highways, and have to back up down driveways so narrow that I have to fold both side mirrors in. In other words, I use my rear-view mirror a lot. And even without a cover, I managed to back-up into a parked motor scooter once. So I decided to sacrifice optimum aerodynamics and have the bed cover start about midway between the top of the bed and the roof. I have a rearview mirror mounted just below the ceiling inside, and being higher than the top of the cover means I can see over it right to the edge of the tailgate. I actually have a better view to the rear than with the stock mirror set up.

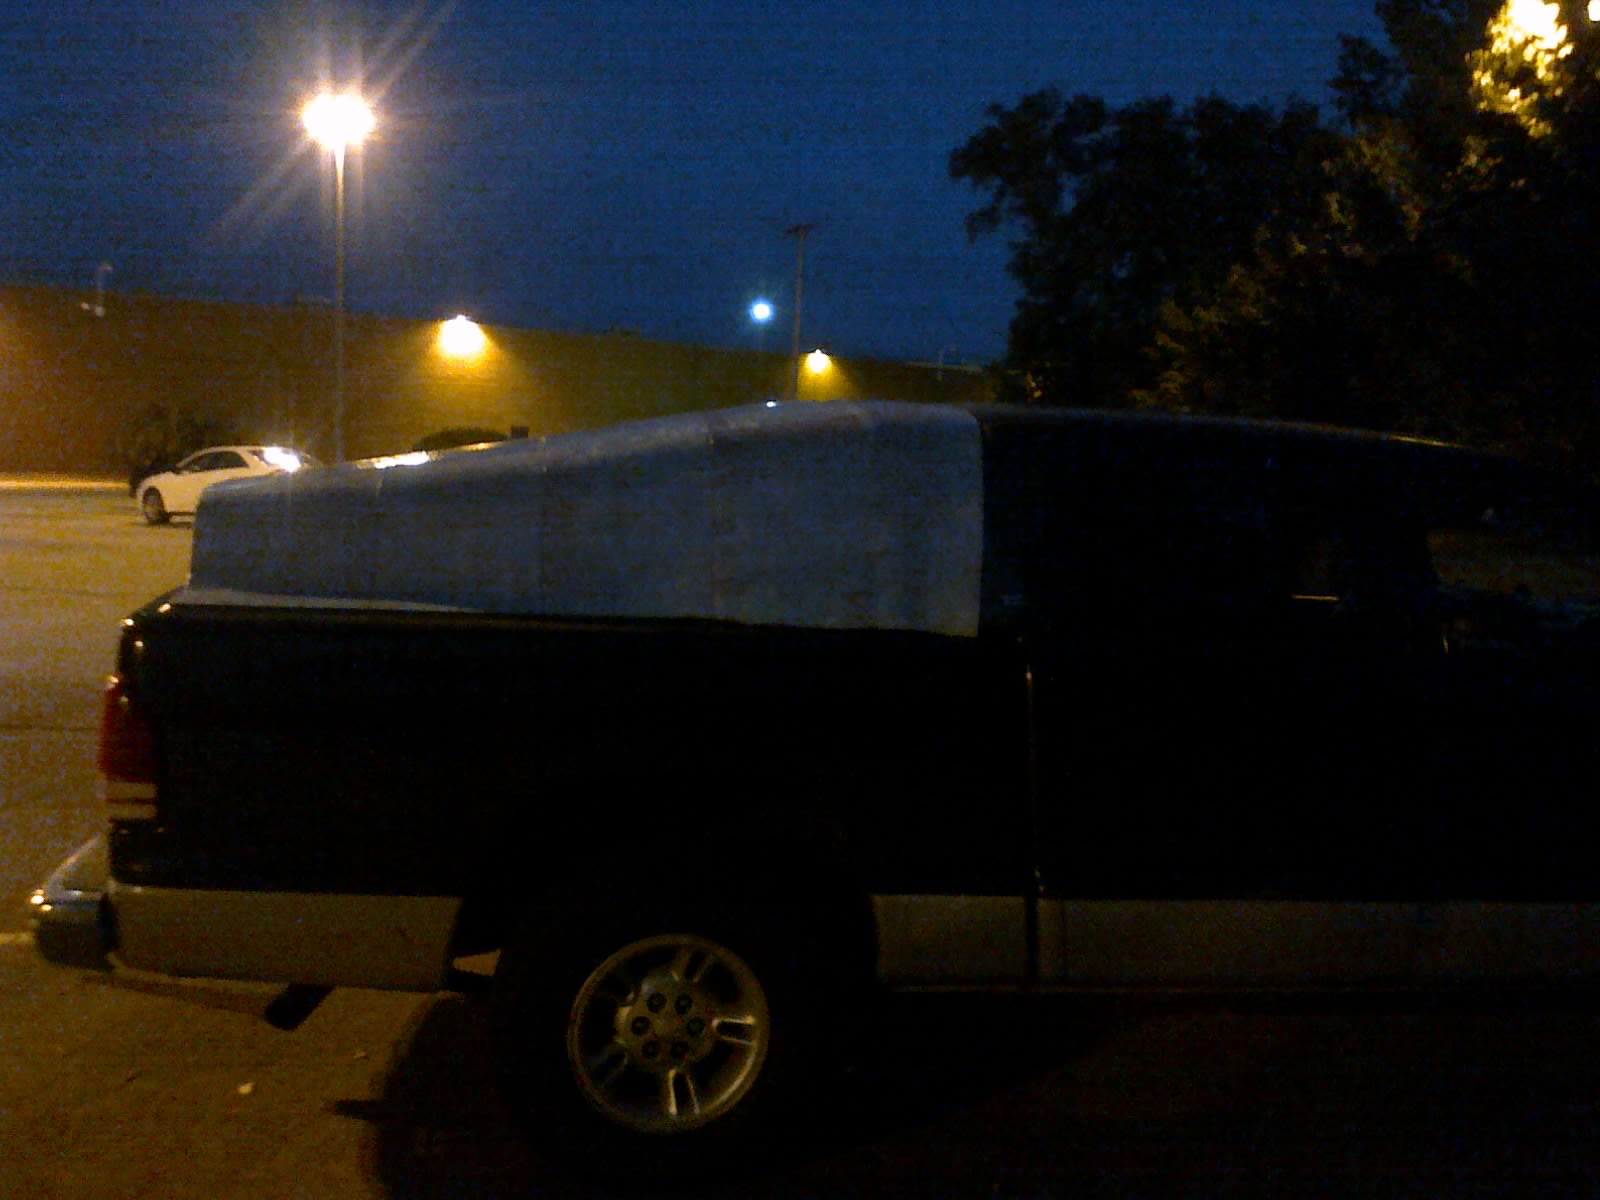
My other consideration that required a major trade off in maximum efficiency for maximum utility is that I regularly use the truck to haul things which would not fit under any of the above aerocaps, even the hinged ones if they were at maximum tilt angle.


Some of the aerocap designs have removable tops, or remove relatively easily for those times, but those times are so frequent for me that it would be extremely inconvenient to have to be constantly removing and replacing a cover. Besides for which, living in an RV, I have nowhere to store a large aeroshell when not in use.
Most of the time my trip goes something like: travel to location with bed empty, pick up bulky stuff, transport it to somewhere else, travel home with bed empty. So if I was going to do anything to make the truck bed more aerodynamic, it had to be something I could remove completely within seconds while in the field, store it out of the way on the truck, and then deploy it again just as quickly for the trip home.
My solution was to take a standard, commercially available roll-up vinyl tonneau cover, and mount it on triangular plywood sheets. When I need to access the bed, I just roll it up. If the bed is empty (or carrying little enough) I roll it down, and the built-in rails keep it locked down. While not the ideal angle, it still lets the air coming off the roof travel down to the tailgate level more gradually.
Vinyl tonneau with metal stabilizers on metal rails attached to plywood sides.
I already owned the tonneau (originally cost about $180), and used some old plywood and bolts I had lying around, for an additional cost of $0
My overall average mileage (on an already heavily modded truck) increased from 26mpg to 28, and test-run highway mileage from 28mpg to 30.
A lower improvement than many of the other designs – no doubt due to not starting at the top of the roofline – but an improvement none the less, and not too far behind most of the other numbers when reporting an actual before and after (as opposed to comparing with the EPA numbers – after all, the expected mileage for my truck is around 15mpg)
There are surely more that I have missed. Hopefully there will be plenty more to come.
Its always best to buy the smallest vehicle that will fit your daily needs, (and rent a truck if you only need one every now and then).
But for those few people who legitimately do need a big truck, there is no reason to resign yourself to terrible fuel mileage. If ecomodders can get hybrid like mileage out of ordinary cars, we should be able to get at least ordinary-car-like mileage out of big trucks.
If you’ve been inspired to improve your own truck, post on the forum with your thoughts and questions. There are a lot of helpful knowledgeable people who will be more than happy to give you any advice you may need to do a similar project of your own.
Update: Oct. 25, 2012 …
For even more examples of aerocaps in the EcoModder forum, see: http://ecomodder.com/forum/showthread.php/comprehensive-list-aerodynamic-pickup-caps-aeroshells-ecomodder-elsewhere-23775.html